[Return to Main Documentation
Page]
In order to continue with the installation of NotifyMail, please select your computer platform:
- Drop NotifyMail into your System Folder. When asked if you want to place NotifyMail in the Extensions folder, click OK.
- Launch Configure NotifyMail
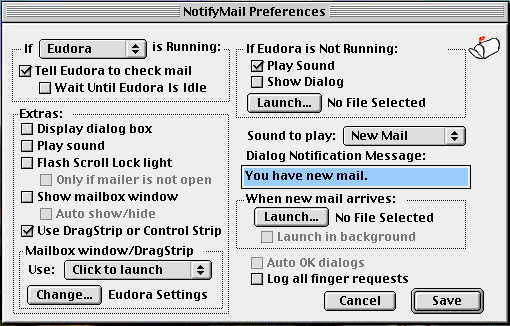
- From the file menu, select Preferences... you will see the
following screen:

-
Select the options you would like to use for NotifyMail. If
your email client is listed in the popup menu in the upper left
corner (by default it is set to Eudora), select it; some of the
options below are based on which email client is selected. The
options are detailed below:
- Tell [Eudora] to check mail: this option will instruct your email client to check for mail when new mail arrives. The text will change based on what email client you have selected.
- Wait Until Eudora Is Idle (Eudora Only): this option will tell Eudora to wait it is idle until checking mail so that you are not interrupted. Eudora will wait 60 seconds from your last action before checking mail.
- Account Name (Emailer and Cyberdog): Enter the
account name you would like to check.
Emailer users: If you only have 1 Internet account you can enter 'Internet' (without the quotes), otherwise enter the account name that you want Emailer to check. If you are unclear on what to enter in this box, consult your Emailer documentation for information on Account names within a particular service.
Cyberdog users must put "In Tray (username@hostname.com)" in the account field. Do not put the quotes in it and replace username@hostname.com with your email account address.
- If [Eudora] is not running: If your email client is not running, you can choose to have NotifyMail play a sound, show a dialog, or launch a file (i.e. your email client)
- Display Dialog Box: If you select this option, NotifyMail will display a dialog box with the message that you have entered in the Dialog Notification Message box. The dialog box will not go away until you click OK, unless you select Auto OK dialogs in which case the dialog will be dismissed after 2 minutes.
- Play Sound: If you select this, NotifyMail will play a sound when new mail arrives. You can select the sound to play by choosing it from the Sound to play popup menu. You will have a choice of all sounds in your System and the sound(s) that are built into NotifyMail.
- Flash Scroll lock Light: If you have an extended keyboard, NotifyMail will periodically flash the scroll lock light. If you select Only if mailer is not open, the light will only flash if your email client is not running. If you do not select this latter option, you can use Control-Escape to turn off the flashing of the light.
- Show mailbox window: If you select this option, NotifyMail will display a small window that floats above all other applications. The Auto show/hide option will make the window appear only when new mail arrives; when you click in the window, the window will then disappear. Command-Escape will show/hide the mailbox window so you can temporarily get it out of your way.
- Use DragStrip or Control Strip: If you are using the NotifyMail Control Strip (located in the Extras folder) or the DragStrip Addition, select this option. See the README - Extras file in the Extras folder for more information.
- Mailbox window/Drag Strip/Control Strip: The options in this section only affect the mailbox window, DragStrip Addition, or Control Strip Module. Normal Count will display the current number of messages that NotifyMail has been notified about. Clicking in the mailbox window, clicking the DragStrip Addition, or choosing Reset Count from the Control Strip module, will reset the count of messages back to 0 (and will bring the flag down on the mailbox). Save Count will save the count of the number of messages across restarts. This option may not be useful to many people. Actual Count will log into your mail server and get a count of the number of messages on your server; we don't recommend using this option as it puts more load on your server. Click to launch will allow you to launch a file, i.e. your email client, when you click in the mailbox window, click on the DragStrip Addition, or choose Reset Count from the Control Strip module. This is used in conjunction with the Change button to select the file.
- When new mail arrives: This option lets you run any file or AppleScript when new mail arrives. If you select an application, you can choose Launch in background.
- Log all finger requests: This option creates a file in your Preferences folder called NotifyMail Log which records all attempts to "finger" your machine; it does not keep track of new mail notifications. Most users will not need to use this option.
- When finished selecting your preferences, click Save.
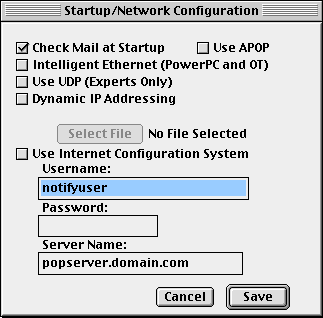
- From the file menu, select Startup/Network Options.You will see the following screen:

-
Select the options you would like from this dialog. The options
are explained below.
- Check Mail at Startup: If you select this option, NotifyMail will log into your POP3 server and determine if you have new mail. Use APOP allows you to use the APOP protocol if your server requires this. If you choose Check Mail at Startup, you will need to fill in your Username, Password, and Server Name. If all of your information is in Internet Config (or in Internet Setup in later system versions), you can choose Use Internet Configuration System and the information will automatically be entered for you.
- Intelligent Ethernet (PowerPC and OT): This option is useful for PowerBook users that are sometimes connected to an Ethernet network, but occassionaly use a PPP connection. If you select this option, NotifyMail will only be active when you are connected to your Ethernet network and will be dormant when you are using a PPP connection. If you switch to Ethernet, you must check mail using your email client or do some other action (i.e. check a website), prior to NotifyMail becoming active (this triggers NotifyMail to wake up).
- Use UDP (Experts Only): This option, as indicated, is only for expert users that are familiar with their server and have their server configured to use UDP. If you don't know if your server is setup to use UDP, it is safe to leave this off.
- Dynamic IP Addressing: This option is a legacy
option; we do not recommend using NotifyMail with dynamic IP
addressing as most users who have dynamic IP address are
using PPP connections. If you are using dynamic IP
addressing and you are on an Ethernet, please contact us and
we can provide you with more information.
- After configuring NotifyMail, you can either select Start NotifyMail from the file menu or you can restart your machine.
- You'll now be instantly notified of new email!
- Create a shortcut to notify.exe and place it in your Startup Items group
- Double click on notify.exe
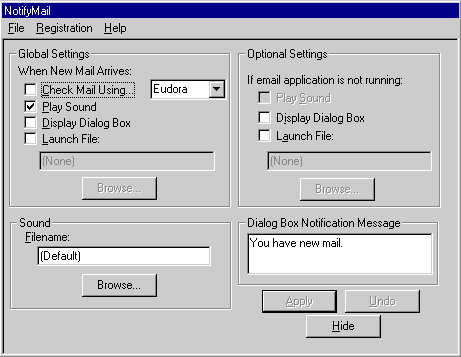
- The first time you launch NotifyMail, the following
preferences box will be displayed:

-
Select your options you would like to use for NotifyMail. If
you want to change your preferences after the first time you
run NotifyMail, double click on the mailbox icon on your
taskbar. Once you have selected the options you want, click on
Hide and the window will disappear; the next time you run
NotifyMail, it will only appear on the task bar.
- Check Mail Using: This option lets you
specify your email client so that NotifyMail can instruct it
to check for mail. Your choices are Eudora, Pegasus,
QuickMail Pro, or MAPI. MAPI should be used for Outlook 98
or any other email client that supports MAPI. If your email
client is not listed, you can still use NotifyMail, but it
will not be able to tell your mail client to check for mail.
NOTE: if you are using Outlook 98 as your email client, you must install the Corporate or Workgroup version (even if you only have Internet mail). If you install the Internet only version, Microsoft removed the MAPI option and therefore NotifyMail can't tell it to check for mail.
- If email application is not running: If your email application is not running (only applicable for Eudora, Pegasus and QuickMail Pro), NotifyMail can be configured to play a sound, display a dialog box or launch a file.
- Play Sound: If you select this option, NotifyMail will play a sound when new mail arrives. You can specify the sound to use by clicking the Browse... button in the Sound box.
- Display Dialog Box: If you select this option, NotifyMail will display a dialog box (with the message specified in the Dialog Box Notification Message area) indicating that new mail has arrived.
- Launch File: If you select this option and choose an application (.exe), NotifyMail will run this when new mail arrives.
- Apply: Once you have made your choices, click the Apply button to write the options to you .ini file.
- Hide: Click this button to hide the NotifyMail window. A mailbox icon will still be visible on your taskbar.
When NotifyMail is running and no new messages have arrived, you will see a mailbox icon on your taskbar.

When one or more messages have arrived, NotifyMail will display a mailbox icon with a flag on your taskbar. If you right click on it, the message count will be cleared and the icon will revert to the plain mailbox. 
- Check Mail Using: This option lets you
specify your email client so that NotifyMail can instruct it
to check for mail. Your choices are Eudora, Pegasus,
QuickMail Pro, or MAPI. MAPI should be used for Outlook 98
or any other email client that supports MAPI. If your email
client is not listed, you can still use NotifyMail, but it
will not be able to tell your mail client to check for mail.
- You'll now be instantly notified of new email!